![]()
This is the print version of this page. All content is copyright Indezine.com 2000-2026.
![]()
Info-things on PowerPoint usage including tips, techniques and tutorials.
See Also:
PowerPoint and Presenting Notes
PowerPoint and Presenting Glossary
This article is not about creating your own macros or scripts to automate PowerPoint. However, if you just want to run any macros or scripts that a friend or colleague shares, then you are on the right page. You can also get many scripts from our PowerPoint VBA Snippets page.
Follow these steps to get started:

Figure 1: The Visual Basic interface

Figure 2: Insert a module
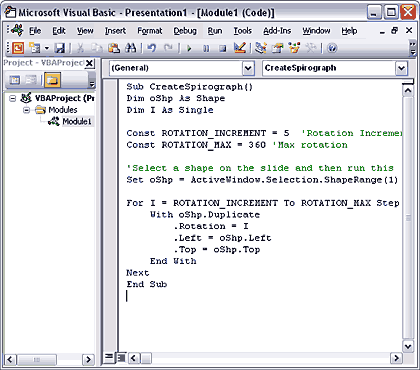
Figure 3: The pasted script

Figure 4: The Macro dialog box
Versions before PowerPoint 2007: Choose Tools | Macros | Macro option to bring up the same dialog box that you saw in Figure 4. Then select the script you want to run, and click the Run button.
Remember, some scripts may do nothing at all unless you have something selected on the slide before you run them!
Tip from Steve Rindsberg: You can store many, many macros/scripts/routines in a single PowerPoint file and as long as you have it open along with any other files, you can access the macros as described.
You May Also Like: Create an Add-in With Toolbars That Run Macros (PPT FAQ by Steve Rindsberg)
Filed Under:
Techniques
Tagged as: Macro, PowerPoint, Programming, VBA
Duplicating objects in PowerPoint should be a walk in the park. But instead, it’s like trying to stack pancakes and having the second one slide off to the side. Imagine this: you’ve got a perfectly placed shape, and you just want its twin to appear right on top — like layering identical stickers. But nope, PowerPoint plays mischief and shifts the clone slightly away like it’s dodging paparazzi.
Why? Because PowerPoint doesn’t just duplicate — it duplicates with style (read: offset). Like a magician doing a card trick, it wants to show you it moved something. PowerPoint insists on placing the duplicated (or copy/pasted) object at an offset position, as you can see in Figure 1, below. The result? Your perfectly aligned design now needs babysitting.

Figure 1: Paste one object over another, and you will see an offset
We asked our PowerPoint buddies — shapes, slides, and all — if there’s any way to stop those copied objects from jumping around.
The verdict? It’s like searching the fridge for chocolate and only finding celery. Disappointment lives here.
You might think there’s a tidy toggle buried in the PowerPoint Options dialog box that says, Please stop nudging my duplicate like it’s trying to escape.
But alas, no such luck. It’s just not in there. No button. No checkbox. Nada.
Registry Magic? Maybe! Some folks whisper of mystical registry tweaks — the Windows equivalent of casting spells with hex codes. But unless you’re a wizard in the land of RegEdit, it’s safer to leave that cave unexplored for now.
So, someone asked, “Why would you want the duplicate to land right on top of the original?” It’s kind of like asking why you’d want to make a perfect photocopy — because sometimes, precision is the whole point!
Here’s when that stacked placement saves the day:
Ever seen a magician swap cards without moving their hands? That’s the vibe we’re going for with PowerPoint animations — one object fades out, and another magically fades in… right in the same spot You’ll spot a clever version of this in our Animated Headshots sample presentation. Think of it as a digital carousel of faces — all appearing one after the other while standing perfectly still, as shown in Figure 2, below.

Figure 2: The Animated Headshots presentation overlaps shapes–one over the other without an offset
Want to spin shapes like a merry-go-round? Then buckle up — because rotation in PowerPoint is all about center alignment. If your objects don’t overlap just right, they’ll rotate like confused ceiling fans wobbling off center.
Imagine you’re rotating a pizza slice around the plate — if it’s not placed smack in the center, you’ll get a wonky spin and maybe fling pepperoni across the room. Same deal in PowerPoint. For smooth turns, each object must be pasted directly on top of the original, like a sticker landing perfectly on its twin. Yes, you want to rotate objects, as shown in Figure 3, below.

Figure 3: Rotate Objects in PowerPoint
So, you’ve got a duplicated object in PowerPoint — like cloning a cookie and then giving it icing — and now you want it to do something cool when clicked? You’re about to enter the world of Trigger animation in PowerPoint.
Think of it like layering transparent stickers. You want one to land exactly where the other is — no nudging, no tilting. Especially helpful when tweaking shadows, glows, or other visual effects.
Ever built a Lego wall where each block must snap into place? Same vibe. Stacking duplicates lets you build pixel-perfect patterns and grids, without playing ‘hunt-the-shape’ across your screen.
So, PowerPoint won’t behave the way you’d like it to — kind of like a toaster that insists on burning only one side of the bread. Frustrating, but not a deal-breaker! Here are some clever workarounds to dodge the drama:
So, you copy an object in PowerPoint and want it to land right on top of the original, like stacking pancakes. Instead? Your freshly pasted twin gets flung a few pixels away — like a rebellious sock escaping the laundry pile. Now, there’s a DIY fix some folks swear by:
Just tap the Up Arrow key twice, then the Left Arrow key twice. It’s like nudging a suitcase back into its closet spot. It can work… but it’s a bit like trying to aim a Frisbee with a sneeze. Sometimes it lands perfectly, other times it vanishes into the shrubbery. Here’s the kicker — this arrow key trick only behaves if Snap to Grid is turned on. Without that, you’re basically herding cats in zero gravity. Snap to Grid acts like invisible parking lines on your slide, helping objects land exactly where they’re supposed to.
Ever copied something from one slide and pasted it on another, only to find it magically lands exactly where it started? That’s no coincidence—it’s PowerPoint’s version of teleportation with GPS precision.
Imagine you’ve got a sticker on one notebook page. When you copy it and slap it onto a blank page, PowerPoint doesn’t ask where—it just knows. Boom! The sticker lands in the same spot, like it had a magnetic homing device.
Let’s say you’ve got a shape, image, or text box that’s boldly spilling off the slide—like a rambunctious kid half out the window during a road trip. Now, if you copy and paste that off-the-edge object onto a fresh slide, PowerPoint doesn’t throw it into the parking lot. Instead, it gently nudges that rebel shape back inside the slide area—as far as it’ll fit.
It’s kind of like copying furniture from one room to another, and PowerPoint saying, “Hmm, let me slide the couch over so it doesn’t block the door.” Smart, right?
But here’s the catch: If the object is bigger than the slide itself, PowerPoint will do its best—but it won’t shrink it or break out the duct tape. You’ll need to resize manually to make it behave.
Duplicating objects and trying to place them exactly on top of each other can feel like lining up stickers blindfolded. Enter PowerPoint’s Align tools — your secret weapon for turning chaotic clones into precision art.
How does this work? Got a bunch of duplicated objects scattered like socks on laundry day? Just scoop them all up (select them), then use: Align | Align Left and Align | Align Top It’s like calling a drill sergeant for your shapes — they instantly snap into formation, shoulder to shoulder, pixel-perfect!
With a little help from VBA, a programming language built within PowerPoint, you can ensure that your pasted objects are placed precisely atop the original, copied picture. Learn more in our VBA Code: Paste in Place tutorial.
Whichever way you use, you will end up with perfectly placed-on-the-top objects, as shown in Figure 4, below (compare with Figure 1).

Figure 4: One object over another, and no offset!
If you have found new ways to work around these issues, do add your comments to this post.
Filed Under:
Tricks
Tagged as: Duplicate, Edit, PowerPoint
Comments Off on Paste in Place in PowerPoint

Echo Swinford, PowerPoint MVP resolves the mystery of the algorithm behind the changing cases in PowerPoint!
Do you use Shift + F3 to toggle through the change case options on selected text in PowerPoint, and wonder why sometimes only the first word gets a capital letter, but at other times all the words get capitalized?
Here’s a more detailed example. Suppose, I double-click to select all the words in a text box on the slide: fetal and neonatal disease. I hit Shift + F3. I expected to get Fetal And Neonatal Disease and then if I hit Shift + F3 again, FETAL AND NEONATAL DISEASE.
Instead, the first time I hit Shift + F3, I get Fetal and neonatal disease. The second time, I get all caps, and the third time I’m back to all lowercase as expected. But how do I know when to expect sentence case (e.g., Fetal and neonatal disease) and when to expect title case* (e.g., Fetal And Neonatal Disease)?
*And yes, I know it’s not a true title case. In fact, you’ll notice that in PowerPoint 2007, this is now called “Capitalize Every Word,” not “Title Case.”
I think this has to do with punctuation, or, rather, an invisible paragraph marker at the end of the text.
Here’s what Beth Melton, Word MVP (thanks, Beth!) and I figured out:
If you select text in a Title Placeholder and Shift + F3, you’ll get title case.
If you select text in a manual textbox, which you get depends on what you’ve selected and also HOW you’ve selected it. In the case of selecting all text in a textbox, for example, “fetal and neonatal studies”…
Personally, this all seems overly complicated to me. Sure wish we could see the non-printing characters; I probably would have figured this out years ago….
*I’m assuming an invisible paragraph marker because if you try the three ways to select text and then paste the text into a new empty textbox, the first two ways give you an empty “paragraph” below, while the third way (right-to-left) doesn’t.
Echo Swinford runs EchosVoice, a site containing many PowerPoint tips. She is also author of Fixing PowerPoint Annoyances and PowerPoint 2007 Complete Makeover Kit.
The views and opinions expressed in this blog post or content are those of the authors or the interviewees and do not necessarily reflect the official policy or position of any other agency, organization, employer, or company.
Filed Under:
Techniques
Tagged as: Case, Echo Swinford, Language, PowerPoint, PowerPoint 2007
Question: I need a PowerPoint presentation that closes itself soon after the last slide has been shown. How do I make such a presentation?
Answer: Follow these steps (works for PowerPoint 2002 and 2003):
You’re done.
Filed Under:
Uncategorized
Comments Off on Self Closing PowerPoint Presentations
Question: How do I add multiple horizontal and vertical guides to my PowerPoint slides.
Answer: Follow these steps:
If you need more guides, follow this process to create a mock guide-map:
Filed Under:
Uncategorized
Comments Off on Add Multiple Guides
Microsoft and the Office logo are trademarks or registered trademarks of Microsoft Corporation in the United States and/or other countries.