![]()
This is the print version of this page. All content is copyright Indezine.com 2000-2026.
![]()
Info-things on PowerPoint usage including tips, techniques and tutorials.
See Also:
PowerPoint and Presenting Notes
PowerPoint and Presenting Glossary
This questions has been asked often, and with PowerPoint 2010 coming up, it’s been asked more frequently. The question is about having multiple versions of PowerPoint installed on the same machine, and if that can cause any problems?
The answer is that generally you should see no problems as long as you follow some guidelines:
Make sure you have the install media for all your PowerPoint (and Microsoft Office) versions — and the serial numbers too!
PowerPoint 97
PowerPoint 2000
PowerPoint 2002 (XP)
PowerPoint 2003
PowerPoint 2007
PowerPoint 2010
After installing each version, reboot your system and install all available updates and service packs before proceeding to install the next successive version. Yes, you need to reboot after installing updates and service packs too!
And if your version of PowerPoint needs online activation (as all versions after PowerPoint 2002 do), then activate before installing the successive version.
By default, the newest versions will take over the associations for the PowerPoint file format but if you need to open a particular file in an older version, you can always use the File | Open options in that version to open that file.
Also, on one of my Windows Vista machines I have no problem having PowerPoint 2003 and PowerPoint 2007 open at the same time — don’t know if this works everywhere though — do try how it works for you!
There’s also a very interesting discussion on this subject on Indezine’s LinkedIn group.
Filed Under:
Uncategorized
Tagged as: Multiple Versions, PowerPoint
Comments Off on Multiple Versions of PowerPoint on the Same Machine?
I got this question from someone who works in a institution that has students with disabilities: How can I set up PowerPoints so that when the mouse is held down, the slides do not trip through whole presentation. I work with students with disabilities who sometimes find this difficult.
The answer is to change the mode in which PowerPoint plays the presentation. You can access the settings to make these changes through the Set Up Slide Show dialog box, accessed differently depending upon the version of PowerPoint you use:
Either way, you end up bringing up the Set Up Show dialog box that you can see in Figure 1, below.
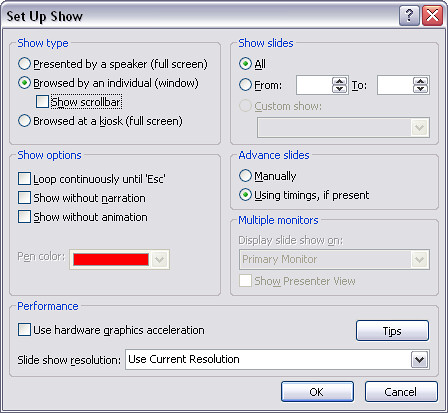
Figure 1: Set Up Show
At the top right of this dialog, you’ll need to select the Browsed by an individual (window) option — and you can also decide whether you want the Show scrollbar option checked. Click OK when done, and save your presentation.
Here are some thoughts, caveats, and observations to be aware of:
Filed Under:
Uncategorized
Tagged as: Basics, Edit, PowerPoint, Show
Comments Off on Prevent Mouse-clicks from Advancing Slides
A friend sent me this question: I want to make one slide .PPS file. On click, or on pressing any key the .PPS file should exit or close. Can this be done?
Yes, it can — it’s easier to do this on click rather than by pressing any key. Follow these steps:
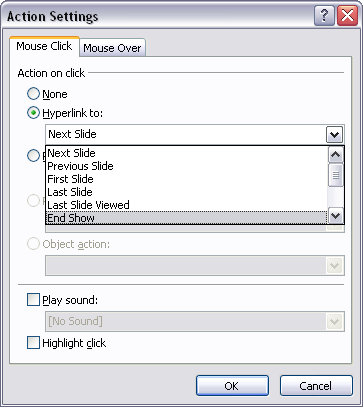
Figure 1: Action Settings
Users of previous PowerPoint versions can double click the rectangle to summon the Format AutoShape dialog box. In this multi-tabbed dialog box, select the Colors and Lines tab, then under the Color dropdown list, drag the Transparency slider to 99%. In the Line Color dropdown list, choose the No Line option. Click OK to get back to the slide.
Filed Under:
Uncategorized
Tagged as: End, PowerPoint, Show
Comments Off on One Click To Close
Question: The problem I am having is that the Arial font size that I save as 32 for visibility, changes to 24 the next time I pull the presentation up. I have looked at the save options and nothing has helped. Do you have any suggestions?
Answer: This might help:

Figure 1: Tweak AutoCorrect options
– AutoFit title text to placeholder
– AutoFit body text to placeholder
– Automatic layout for inserted objects
Filed Under:
Uncategorized
Tagged as: Options, PowerPoint
Comments Off on Stop Font Sizes from Changing
This quick tutorial was provided with George McCaskill of Visual Exemplars, a UK based company that creates Perspector, a 3D add-in for PowerPoint.

Figure 1: A Perspector 3D list.

Figure 2: A Perspector list with PowerPoint 2007 effects.
Filed Under:
Uncategorized
Tagged as: Perspector, PowerPoint 2007
Comments Off on 3D Lists in PowerPoint 2007 with Perspector 4.0
Microsoft and the Office logo are trademarks or registered trademarks of Microsoft Corporation in the United States and/or other countries.