![]()
This is the print version of this page. All content is copyright Indezine.com 2000-2026.
![]()
Info-things on PowerPoint usage including tips, techniques and tutorials.
See Also:
PowerPoint and Presenting Notes
PowerPoint and Presenting Glossary
A reader asked if there were any shortcut keys in PowerPoint that could let her go from Normal view to Slide Sorter view? The answer is both no and yes, no because there’s no real shortcut to do that and yes because there is such an easy workaround.
What you need to do is quickly press the Alt + V keyboard shortcut to bring the View tab of the Ribbon in focus, and then press the D key immediately thereafter. So you would use the Alt + V > D sequence to get to Slide Sorter view.
Fortunately, you can quickly access all PowerPoint views with similar keyboard sequences:
Normal View: Alt + V > N
Slide Sorter View: Alt + V > D
Slide Show View: Alt + V > W (also F5)
Notes Page View: Alt + V > P
Additionally, you can use the Alt + V > Z sequence to bring up the Zoom dialog box. This keyboard sequence works in most views but will not work in Slide Show view.
Tip: To go from Slide Show view to Normal view, press the Esc key.
Do note that all these keyboard sequences work in Windows versions of PowerPoint.
So why did Microsoft not create proper keyboard shortcuts for these views, and why do they have these sequences instead?
I don’t know the answer for the first part of the question, but yes there is an answer for the second part: these keyboard sequences were essentially for using the menu options in older versions of PowerPoint that had no Ribbon interface. And they continue to work in the newer versions of PowerPoint.

Comments Off on Keyboard Shortcuts for PowerPoint Views
All the new Microsoft Office file formats that were introduced with Office 2007 are essentially XML-based. These new formats are distinctive with their X suffixes, so that PPT evolved as PPTX (similarly DOC as DOCX, and XLS as XLSX) — these new file formats continue being used in all subsequent versions of Office on both Windows and Mac. However, they are all essentially ZIP files. The ZIP file acts as a wrapper that contain plenty of XML files and other media content.
So how far would any WRM (Windows Rights Management) protection help? Won’t savvy users be able to unzip those files and get to the content, even without using any WRM credentials? We tested this scenario by adding a ZIP extension to a WRM protected PowerPoint PPTX file, and then tried to unzip the file.
However, the unzipped folder showed up as empty! Follow these steps to see how this process works:
Restricted PowerPoint.PPTX
It would now be renamed to:
Restricted PowerPoint.ZIP

Figure 1: Change the file extension?

Figure 2: An empty Zip file!

Figure 3: Just a ZIP, no unZIP!
This indicates that your WRM (Windows Rights Management) protected presentation is actually fully protected!
Filed Under:
Uncategorized
Comments Off on Is WRM Safe for XML-based PowerPoint Files?
Received a question from an Indezine reader: Can you help me? I have built a target diagram using your tutorial (Thank You for this). However, I now am trying to write text within each of the target rings. Is it possible to shape the text to circular text?
Sure you can! Follow these steps:


This opens a sub-gallery — within the Follow Path category, choose the top left option, as shown in the Figure above.

Filed Under:
Uncategorized
Tagged as: Shapes, Text, Tutorials
Comments Off on Add Circular Text to Target Diagrams (any Shape) in PowerPoint 2010 for Windows
If you get a Data Assistant warning when you run PowerPoint 2007, here’s what may be actually happening.
Data Assistant was something Microsoft provided for PowerPoint 2003 users so that they could insert and manage graphical data objects such as Visio drawings, and Excel charts and named ranges into PowerPoint presentations. They stopped providing the Data Assistant, and I’m guessing this has not been updated for PowerPoint 2007 — you’ll need to disable it.
You can also remove Data Assistant altogether from your computer:
Filed Under:
Uncategorized
Tagged as: Add-in, PowerPoint 2007
Comments Off on Data Assistant Warning in PowerPoint 2007
I’ll tell you an easy way to get frustrated, and an easier way to overcome it!
Get hold of a PowerPoint slides that has many animated slide objects that overlay each other. Now select the object stacked right at the bottom of the other objects. Does this have to be so difficult?
To select objects that are not too easy to access, you should use the Select Multiple Objects tool (if you use PowerPoint 2007, this does not apply to you). If you haven’t heard of this animal, I won’t blame you because it’s not visible by default. First you need to customize your Drawing toolbar to see this option:
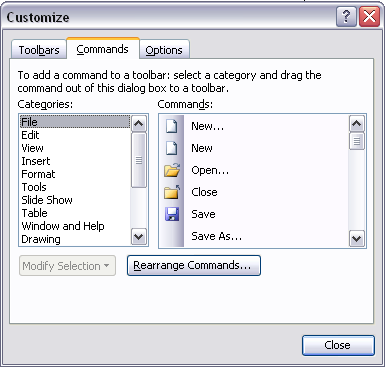
Figure 1: Customize
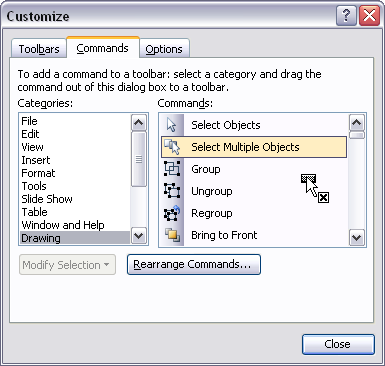
Figure 2: Drag the icon to the toolbar
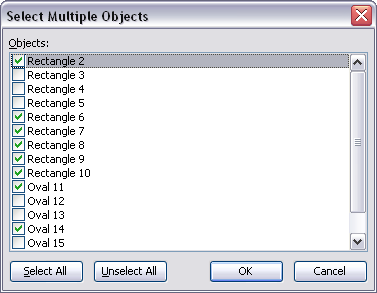
Figure 3: Select Multiple Objects
Note: PowerPoint MVP Shyam Pillai creates the Shape Console add-in that adds a miniature floating window inside PowerPoint — this displays the current selected shape on the slide. Shape Console is a free download.
Filed Under:
Uncategorized
Tagged as: PowerPoint 2003, Shapes, Tutorials
Comments Off on Select Multiple Objects in PowerPoint 2003
Microsoft and the Office logo are trademarks or registered trademarks of Microsoft Corporation in the United States and/or other countries.