 (2 votes, average: 5.00 out of 5)
BrightCarbon is a presentation design agency that helps businesses create impressive PowerPoint presentations. They also offer free tools and resources, including BrightSlide, an add-in that makes PowerPoint easier and more powerful to use. BrightSlide is available as a PowerPoint add-in on both Windows and Mac.
You May Also Like: BrightSlide Add-in for PowerPoint: Conversation with Richard Goring | BrightSlide: Creating a Revolutionary PowerPoint Add-in
Although you can use PowerPoint’s native image export options, using BrightSlide to export images in PowerPoint offers several added advantages:
1. Higher Image Quality
PowerPoint’s native export limits PNG and JPEG images to 96 DPI by default (though you can tweak this via registry hacks). BrightSlide allows exporting at higher resolutions without needing registry edits, ensuring crisp, professional-quality images.
2. Easier Workflow and Automation
Instead of navigating multiple menus in PowerPoint, BrightSlide offers a streamlined one-click export. It integrates well into professional workflows where consistency and speed matter.
3. Free and User-Friendly
BrightSlide is 100% free, unlike some other add-ins. The interface is more intuitive than PowerPoint’s default settings, making it easy for non-technical users.
If you frequently need high-quality images from PowerPoint for reports, web content, or social media, BrightSlide is a powerful and efficient alternative to PowerPoint’s built-in export. 🚀
Exporting Images Using BrightSlide
To export images from your PowerPoint presentation using the BrightSlide add-in, follow these steps:
- Install BrightSlide: Ensure that the BrightSlide add-in is installed and active in your PowerPoint application. You can download it for free from the BrightSlide website.
- Open Your Presentation: First things first—open PowerPoint (yep, the little orange “P” icon). Now, find the presentation that has the slides you want to turn into images and open it up, as shown in Figure 1, below. If it’s already open, congrats! You’re ahead of the game. 🚀
- Select slides to export as images: Look to the Slides pane on the left side of your screen, highlighted in green within Figure 1, above. Here you see mini previews of your slides. Click on the ones you want to export. Need more than one? Just hold down the Ctrl key (or Cmd if you’re on a Mac) and click each slide.
- With the slides selected for image export, access the BrightSlide tab of the Ribbon, as shown highlighted in red within Figure 2, below.
- In the BrightSlide tab on the Ribbon, find the File & Master group. Now, click on the Export button, and a drop-down menu appears, as shown in Figure 3, below. Next, look for the Export Selected Slides as Images option—it’s the one highlighted in red within Figure 3. Click it, and you’re good to go!
- Doing so summons the Export Selected Slides as Images dialog box, as shown in Figure 4, below. You can choose to export to a Format (file type), as shown highlighted in red within Figure 4.
- PNG (P-N-G, like “ping”)
Think of PNGs as your fancy, clear pictures. Basically, this file type retains all the image information, so it stays crisp. - JPG (J-P-G, like “jay-peg”)
These are your standard photo files. These files tend to be smaller in size, so they’re easy to share. However, they lose a tiny bit of quality each time you save them. - TIF (T-I-F, or TIFF)
These files keep all the picture details, so they look amazing. But, they’re big files, and are good for professional printing and high-end photography. - GIF (G-I-F, like “gif” or “jif”)
GIFs can be short, moving pictures. They’re also good for simple pictures with just a few colors. - BMP (B-M-P)
These are the plain, simple picture files. They don’t squish the picture down, so they’re big. They are less used in modern times. - EMF (E-M-F)
These are vector images as opposed to bitmaps, composed of lines and shapes, and not just pixels. They generally stay sharp when you make them bigger or smaller. - Next, you can choose the width and height of the exported slide images in pixels, as shown in Figure 5, below.
- Once you are happy with the setting chosen within the Export Selected Slides as Images dialog box, you press the OK button. If your presentation file is stored on the cloud, you will see the File in unsupported location dialog box, as shown in Figure 6, below. You will have to press the OK button to proceed.
- You will next see the Save Pictures to… navigation box that lets you choose a folder to save your exported images, as shown in Figure 7, below.
- BrightSlide will now export the images to the chosen folder and show you a message window, as shown in Figure 8, below. Click the Yes button to open the folder where the images have been saved.

Figure 1: Open your presentation with BrightSlide installed
Alternatively, you can select slides similarly in Slide Sorter view. To go to this view, click on the Slide Sorter icon on PowerPoint’s Status Bar, highlighted in red within Figure 1.

Figure 2: Slides selected in Slide Sorter view

Figure 3: Export Selected Slides as Images
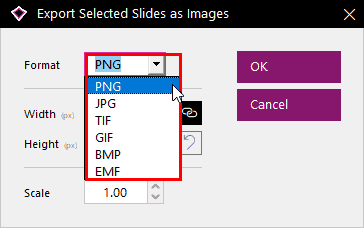
Figure 4: Choose the file type to export
You can choose from several file types, listed below:

Figure 5: Width, height, and scale
You will find the Width and Height options within this Export Selected Slides as Images dialog box, as shown highlighted in red and green respectively within Figure 5, above. The values shown by default are the ones that PowerPoint uses by default for the slides. However, you can change the Width and Height values as needed.
Do note that the Width and Height values are linked proportionately. This means that when you change one value, the other changes as well. However, you can also change both values independently if you click the Lock button, highlighted in blue within Figure 5. Also, if you played around with all values, and want to get back to the default PowerPoint values, you can click the Reset button, highlighted in orange within Figure 5.
Finally, you can also resize percentage-wise by modifying the value in the Scale box, highlighted in purple within Figure 5.

Figure 6: Export Selected Slides as Images dialog box
If your presentation file is not stored on the cloud, you will not see this dialog box.

Figure 7: Save Pictures to
Navigate to the required folder and click the Select Folder button, highlighted in red within Figure 7, above.

Figure 8: Slides exported as images