
 (7 votes, average: 4.86 out of 5)
There are literally hundreds of PowerPoint add-ins out there, and they all plug into PowerPoint and ensure that you can do anything from inserting multiple pictures on your slide to sharing your slide content online. Others repurpose your slides so that your content can be reused in so many other ways. Of course, if I were to describe what PowerPoint add-ins can do, I would run out of pages to write and you would have no time to read the long post!
So, let’s look at add-ins that people tend to use every time they create slides. Yes, these are add-ins that you cannot live without and you cannot imagine using PowerPoint without them plugged in.
There are five add-ins that fit within this scope, and while one of them is free, one is freemium. The third one doesn’t cost much at all. The fourth is a little more expensive but it’s totally worth it. Finally, the last one is subscription-only. As you can see, not only have I found five of the best PowerPoint add-ins you can use every day, I also compiled this list in a way so that you will find at least one add-in that works for you. Of course, there’s no reason why you cannot use all five of them.

These five add-ins are:
- BrightSlide from BrightCarbon
- THOR from PPTools
- ToolsToo from Gil Segal
- NXPowerLite from Neuxpower
- Ampler from Ampler
1. BrightSlide from BrightCarbon
BrightSlide is a free PowerPoint add-in from BrightCarbon, a PowerPoint and presentations design firm that creates slides for enterprise clients. BrightSlide does require an optional registration that’s again free, and installs as a new tab in the PowerPoint Ribbon, as shown in Figure 1, below.
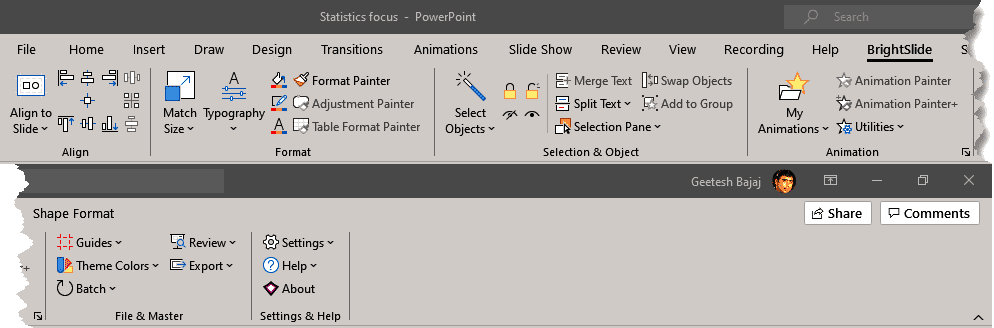
Figure 1: BrightSlide tab of the Ribbon
So, why do you find BrightSlide on this list of best add-ins for everyday use? That’s because I use it each day. It’s got so many features that PowerPoint should have had out of the box but does not. It also includes commands that are already available within PowerPoint, but you won’t have to go searching from them since they are on the BrightSlide tab: )
We won’t go exploring every single feature from BrightSlide here, but I love the animation features such as the My Animations option that comes prebuilt with animation sequences, which are two or more animations applied to an object. Plus, you can save your favorite sequences too. The Hide During Slide Show option for animations is a life-saver, especially if you receive a 50-slides deck that has animations on every slide! All you want to do is see the slides one at a time without animations. Of course, this option exists inside PowerPoint too but it takes four clicks to achieve the same result, and four clicks again to get back to the previous, animated state.
Before using BrightSlide, I used YOUTools, a now-deprecated PowerPoint add-in created by Jamie Garroch of BrightCarbon. While BrightSlide includes many more options than YOUTools, it leaves out a few of them. And that brings me to my favorite experience in using BrightSlide. All the missing options are available in BrightSlide with a not-so-obvious option. You can visit BrightSlide’s Ribbon Setup dialog box, and choose to bring back these Legacy Tools, as shown highlighted within red in Figure 2, below. This option is unchecked by default.

Figure 2: Bring back YOUTools options in BrightSlide
Doing so brings back these amazing options, as shown in Figure 3, below.
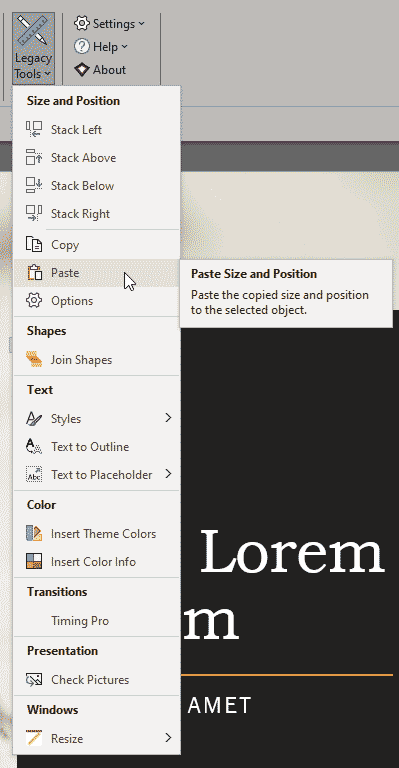
Figure 3: Paste Size and Position in BrightSlide
My favorite among these tools is the Paste Size and Position option that allows you to place slide objects such as pictures, text boxes, and more that possess the exact size and position attributes across successive slides. This feature alone can save PowerPoint designers hours of time.

I reached out to Richard Goring, a Director at BrightCarbon to learn more about BrightSlide, why they created this fantastic add-in, and why they give it away for free?
Geetesh: Richard, can you tell me more about why BrightCarbon created BrightSlide, and did you create some of its tools to help your workflows?
Richard: We at BrightCarbon love PowerPoint – it’s why I spent my free time making a Death Star using nothing but the Merge Shape tools and built-in 3D effects. But any regular PowerPoint user will be able to testify to the fact that though it is a well-loved program, it certainly has its quirks.
Any power user of PowerPoint will probably be able to give you a list of all the things that they wish PowerPoint could do. And for any designer used to working in the Adobe suite – don’t even get them started, they would most likely just prefer to save out a beautiful jpg from Illustrator and never go near PowerPoint.
Out of this context, we at BrightCarbon created BrightSlide, a free add-in that makes working in PowerPoint easier, more intuitive, and more efficient. We pulled together a list of all the ‘must-haves’ and ‘nice-to-haves’ from regular PowerPoint users, power users, and designers who are most used to working in the Adobe suite, and we created the ultimate add-in to revolutionize PowerPoint productivity.
These user groups – from BrightCarbon, other industry leaders, and community members – sent in their ideas, and together with some existing features, Jamie Garroch, BrightCarbon’s Senior Technical Consultant had already developed, BrightSlide was born.
Some of the things I think BrightSlide really changes the game on are:
- Intuitive alignment
- Animation libraries and batch processing
- Typography line and character spacing
- Easy selection pane functions
- Editing groups
- Setting up custom grids and guides
- Exporting your deck to images or as separate slides
- And for all you Adobe lovers out there, BrightSlide also enables some of the most-used shortcuts to work in PowerPoint too!
Now we must confess that BrightSlide wasn’t a solely selfless venture – our entire team uses BrightSlide and often fuels our feature requests thanks to new and perplexing effects they’re trying to achieve on behalf of our clients. But one of the reasons we made it available for free is that we want these gains to benefit everyone who uses PowerPoint. When you suddenly realize that in a couple of clicks you’ve literally saved a couple of hours, that’s the kind of joy we want to spread.
2. THOR from PPTools
Steve Rindsberg is someone who’s been creating PowerPoint add-ins since the time when there were probably fewer add-ins available than the fingers in your hand. On his PPTools site, you can find a bunch of add-ins, but if I had to choose just one of them in this list, then it must be THOR. THOR is similar in its concept to the Paste Size and Position option in BrightSlide that we have already explored earlier. However, THOR takes this concept many steps further and allows customizations you never thought were doable.
Once installed, THOR places itself in the new PPTools tab of the Ribbon in PowerPoint, as shown in Figure 4, below. If you already have one of Steve’s other add-ins, then it will populate within an existing PPTools tab.
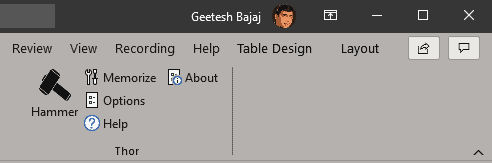
Figure 4: THOR in the PPTools tab
Using THOR is simple. You select an object and click on the Memorize button. You then select an object to port attributes of the first object and click the large Hammer button. This option works with all sorts of slide objects such as text boxes and placeholders, pictures, shapes, tables, SmartArt, charts, and even video clips. You can also work across different slide objects, as in copying attributes from a shape and applying them to a picture.
However, there’s so much more you can do. Let us click the Options button in THOR to explore. Doing so brings up the small THOR Options window shown in Figure 5, below.

Figure 5: THOR Options
The first option you see is Alignment, and the Center radio button is selected for you. Do you find yourself in a situation where you want to reposition your slide objects, anchored from the bottom-right rather than the center? Then you can just choose the Bottom-right radio button.
While THOR defaults to positioning, you can also choose to resize the hammered object by selecting the Resize option. Of course, as soon as you choose the Resize option, you’ll want your objects such as pictures to not be distorted on resizing. In that case, you’ll can select the Don’t distort checkbox, as shown highlighted in red within Figure 6, below.
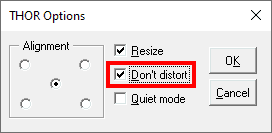
Figure 6: Don’t distort
The final option is Quiet mode. This option is selected by default, but you can turn it off if you want to see position attributes each time you hit the Memorize button, as shown in Figure 7, below.
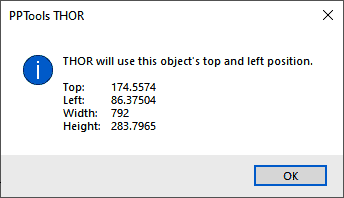
Figure 7: Position in THOR
So, what do I like about the THOR add-in for PowerPoint? It is a great timesaver for anyone who wants to move objects to the same position on multiple slides. Once you use it a few times, you’ll find it difficult to work without THOR.
THOR is essentially a free product, but is there an upgrade? In a way, yes. THOR started life as one of the tools in PPTools StarterSet, and Steve also has a more full-featured version called StarterSet Plus. Both StarterSet and StarterSet Plus are designed to work in 32-bit versions of Microsoft Office, which most people use. If you use a 64-bit version of Microsoft Office, you will have to be content with just using THOR, which isn’t a bad option at all: )

I reached out to Steve Rindsberg to know more about how THOR was created, and how PowerPoint designers and presenters use it.
Geetesh: Steve, why did you create THOR as a separate add-in?
Steve: Taylor Croonquist, a man with a fine eye for anything that makes our PowerPoint life simpler, faster and more efficient, badgered me into doing it.
That and the fact that I wanted to start converting some of my older add-ins to be compatible with 64-bit PowerPoint and to make use of the Ribbon. My plan was to split the earlier StarterSet into a few standalone tools, all of which appeared on a new PPTools tab on the Ribbon, so that people could choose to install and use just the ones they wanted.
The Hammer tool from the StarterSet was the obvious choice, and because I’m a nice guy, I decided to make it a free add-in. And gave it an updated installer that’d make the IT crowd happier. And, there you have it. And why is it called THOR? That’s on Taylor too. He was writing about the original StarterSet and thought it was fun to refer to its Hammer icon as the Thor tool. So did I.
Geetesh: Can you share some stories of how people use it within their PowerPoint presentations?
Steve: I think the two most common uses are:
- Making a logo or other image line up precisely from one slide to the next across an entire presentation when it appears on more than one slide.
- Auto-sizing an image to fill the entire slide. Click the Memorize button with nothing selected and THOR memorizes the slide’s size. Select an image or other shape, click The Hammer of THOR and it’ll fill the slide.
- Or fill it to the extent possible without distortion. Or if you choose, force it to fill, distorted if need be.
THOR is powerful, but he’s agreeable!
ToolsToo from Gil Segal
ToolsToo is a PowerPoint add-in from Gil Segal that adds so many capabilities to PowerPoint. Its features are time-saving, powerful, and logical. Most features have evolved from customer feedback, and the add-in is being continuously developed. Plus, the add-in doesn’t cost much and should be in any PowerPoint user’s software chest. This add-in has been around for more than a decade and I find myself using it so often.
One of my favorite features in ToolsToo is the Reference Shape tool. This tool is a set anchor, and although it’s named Reference Shape, your selected anchor need not be a shape, and can be any slide object including a picture, a text box, or something else.
The Reference Shape tool works with all ToolsToo options, but let’s use the Alignment tools as an example. Without ToolsToo installed, when you align a bunch of shapes leftwards in PowerPoint, you can align them to either the slide or to the leftmost shape in your selection. However, ToolsToo takes alignment to a whole new level by letting you choose from four different anchors. As already explained, ToolsToo calls these anchors Reference Shapes, and these are First Shape, Picked Up Shape, Presentation Space, and Slide, shown highlighted in red within Figure 8, below:
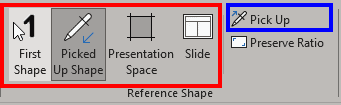
Figure 8: Reference Shape in ToolsToo
Let us now individually explore these four Reference Shapes:
- First Shape: The first shape you select is the Reference Shape. For example, if you have four shapes to align, and you select them individually by Ctrl clicking, the last three shapes you select will be aligned using the first shape you selected.
- Picked Up Shape: You can select any shape and click the Pick Up button, shown highlighted in blue within Figure 8, above. The shape you pick up can be in any open presentation (not just the one you are currently editing) and it will remain available as long as that presentation is open.
- Now you can select shapes or other slide objects, and ToolsToo will remember and align all slide objects to the Picked Up Shape.
- ToolsToo will remember this one as the Picked Up Shape unless you set another shape, or restart PowerPoint, or close the presentation that contained the Picked Up Shape, in which case you have to start all over again and identify another Picked Up Shape.
- Presentation Space: Using this option, you can identify a shape or another slide object as the Presentation Space. This option may not work so well to align shapes in some cases, but imagine if you could insert a shape in your Slide Master, even off the slide area, and set its Rounded Corners attribute. Now, you can always set Presentation Space as your Reference Shape, and select any number of rounded rectangles on your slide. Next, click the Make Size button, and choose the Make Same Rounded Corner option, as shown in Figure 9, below.

Figure 9: Presentation Space in ToolsToo- To set any object as the Presentation Space, you must set its Alt text description to ToolsToo_PS.
- Slide: The Slide option uses the entire Slide Area as your anchor to align slide objects and make other adjustments.
The Reference Shape feature alone makes ToolsToo a super add-in that can save you hours of time. ToolsToo provides you with options to align, resize, match, select, or space out based on several anchors, thus creating almost infinite possibilities for you.
Let’s now explore more. Since ToolsToo has so many features, it can be sometimes intimidating for newbies. To counter this issue, the add-in allows you to choose from three different UI modes:
- Beginner: This mode provides a minimal set of tools that’s perfect for someone getting started with ToolsToo, as shown in Figure 10, below.

Figure 10: ToolsToo Beginner Mode- Internediate: This mode provides a more varied set of tools that’s perfect for someone who’s used ToolsToo for a few days, as shown in Figure 11, below.

Figure 11: ToolsToo Internediate Mode- Expert: This mode provides all tools and is something that you should explore when you are comfortable with options shown in the other two modes and want to explore more.
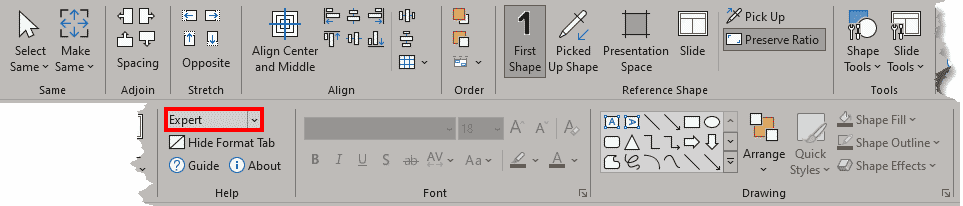
Figure 12: ToolsToo Expert Mode
Of course, if you are comfortable with Expert mode from the first day, that’s what you should look at. That’s what I did and was able to enjoy the power of ToolsToo to the fullest.

I reached out to Gil Segal to understand better how ToolsToo helps PowerPoint users, and what’s upcoming in the next release of this add-in.
Geetesh: Gil, how does ToolsToo help everyday users work faster and more efficiently? Please share your thoughts.
Gil: The set of tools in ToolsToo Pro for PowerPoint (ToolsToo for short) makes it easier and faster to create high-quality PowerPoint slides. ToolsToo automates tasks that are either tedious or impossible to do precisely by hand. Some of the more notable examples of this include:
- Make Same Table Format – copies the formatting from a table to other tables
- Make Same Rounded Corner – copies the exact arc of the rounded corners from a shape to other shapes
- Add to Group – adds one or more shapes to an existing group while preserving the group’s animation and front-to-back sequencing
- Replicate – replicates the selected shapes in a grid pattern
- Make Same Motion Path End – applies the end point from a shape’s motion path to the motion paths of other shapes
- Copy to Motion Path End – copies shapes to the end points of their motion paths
- Reset Motion Path Start – resets motion path start points to shape centers
- Copy Agenda Slide – copies agenda slides to all other agenda slides and highlights topic progression
- Reformat Slides – corrects slide colors after pasting slides from a different deck
- Consolidate Layouts – consolidates layouts from multiple masters, by name
All the ToolsToo tools are readily accessible via the ToolsToo Ribbon tab and the resulting slides are normal PowerPoint slides that can be shared with anyone, regardless of whether the recipient has installed ToolsToo.
Geetesh: Can you tell us about what’s coming up in the next release of ToolsToo?
Gil: The next version of ToolsToo Pro for PowerPoint will be v9.1 and it will take productivity to the next level! I’ve often found myself repeating the same sequences of ToolsToo tools on multiple slides or with different shapes. With v9.1, you can automate these sequences in two different ways and make them available with a single click.
Using a UI like PowerPoint’s built-in Ribbon customization screen, a ToolsToo user can create and edit ToolsToo tool-chains. These chains can include any of the ToolsToo tools and options, as well as some additional chain tools (e.g., Delete First Selected Shape and Paste Last) to help with automation. Once created a chain can be selected and run, executing all the tools defined in the chain with a single click.
Additionally, in v9.1 all the ToolsToo tools have been exposed to VBA and are easily callable as part of VBA macros for even more advanced automation. Look for ToolsToo Pro for PowerPoint soon!
NXPowerLite from Neuxpower
I have been using PowerPoint for around twenty-five years now, and it looks like NXPowerLite has been around forever. Actually, NXPowerLite is around twenty years old now as I write this post, and I’ve always had happy memories of using this amazing add-in. NXPowerLite does one thing, and it does it so well, that it’s almost indispensable. Whereas most PowerPoint add-ins perform many tasks in PowerPoint, NXPowerLite performs one task in PowerPoint and many other programs. So, what is this task? It is to reduce file sizes from many file formats.
NXPowerLite started life as something that compressed PowerPoint files but now it does the same magic with image files, Microsoft Office files, and Adobe PDFs too. NXPowerLite also auto-compresses attachment files within Microsoft Outlook. Plus, they also have a server version that ensures all your files are optimized so that the files themselves take less space, and also so that the performance of such files is snappier.
Our focus for this post is NXPowerLite’s compression of PowerPoint files. The company that creates this add-in is Neuxpower, and they are based out of the UK, and headed by Mike Power.
When installed, NXPowerLite does add a button to one of PowerPoint’s Ribbon tabs, as shown highlighted in red in Figure 13, below.

Figure 13: NXPowerLite in the Ribbon
However, we won’t use NXPowerLite from within PowerPoint. Instead, we will use the NXPowerLite standalone program that directly works on the files. You can see the NXPowerLite interface in Figure 14, below.
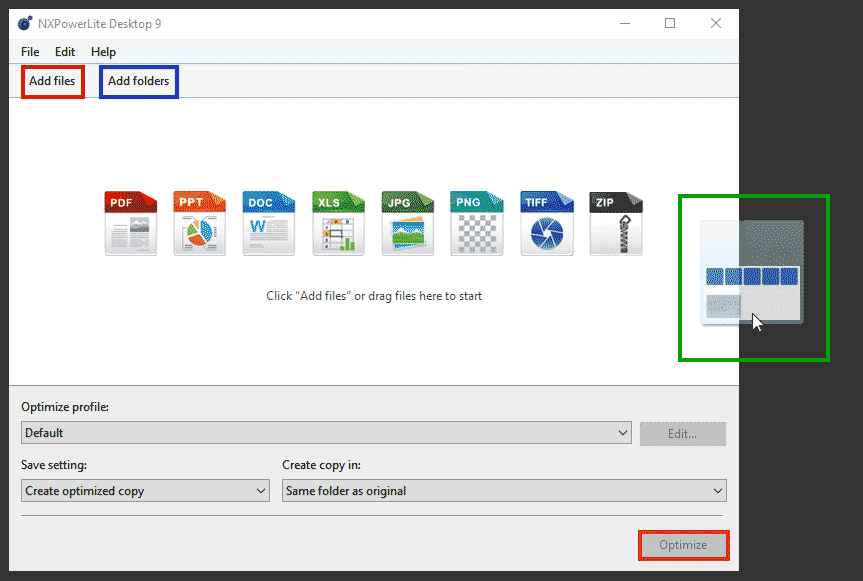
Figure 14: NXPowerLite interface
Let us now do a small walkthrough of NXPowerLite:
- You can choose to add a single file to compress by clicking the Add files button, highlighted in red in Figure 14, above. Or you could add an entire folder of files to compress, using the Add folders button, highlighted in blue in Figure 14. Or you could drag an individual file, multiple files, or folders into the NXPowerLite window, as we did, and can be seen highlighted in green in Figure 14.
- You next decide if you want to use NXPowerLite’s default settings or customize them. To customize settings, you can create a new profile by clicking on the Optimize Profile option, and choosing New optimize profile… from the resultant drop-down list, as shown in Figure 15, below.

Figure 15: New optimize profile in NXPowerLite- Doing so brings up the New Optimize Profile dialog box, shown in Figure 16, below. You can provide a name for the profile and change settings in each of the tabs. You can see the PowerPoint tab in Figure 16. We won’t explore individual settings in this walkthrough, but it’s great that you can create any number of such profiles for your customized needs. Additionally, these profiles can be further edited and fine-tweaked.
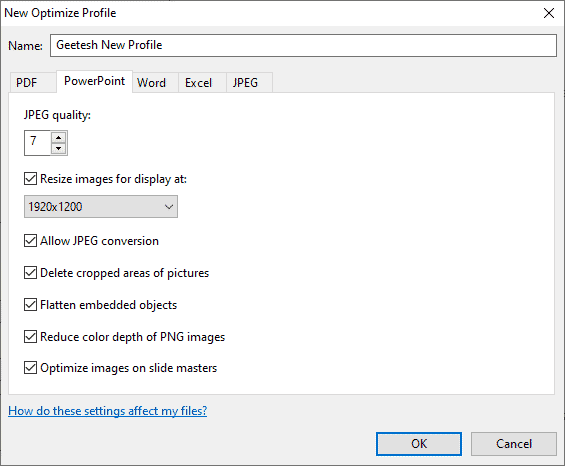
Figure 16: New profile created in NXPowerLite- You can also choose from three Save settings, as shown in Figure 17, below.

Figure 17: NXPowerLite Save settings- These three Save settings are:
- Create optimized copy: This option creates an optimized copy of your original file. The new, optimized copy is saved with a new suffix, which is typically (NXPowerLite Copy). You can opt to save the optimized file in the same folder as the original file, or in another folder.
- Backup and replace original: This option creates an backup copy of your original file, which is suffixed (NXPowerLite Backup). The new, optimized copy is saved with the original file name. Again, you can opt to save the backup file in the same folder as the original file, or in another folder.
- Replace original: This option optimizes and overwrites the original file.
- You finally click the Optimize button, highlighted in orange within Figure 14, shown previously on this page.
Whichever approach you choose, you can rest assured that NXPowerLite will look into the innards of your files and remove all extraneous content, reduce the size of pictures embedded, and also save optimized files in the location you specified.

I connected with Mike Power to out to learn more about the typical NXPowerLite user.
Geetesh: Over the years, how indispensable has NXPowerLite become for PowerPoint users, Mike? Can you share some thoughts you hear from them?
Mike: We have been delighted, and honestly a little surprised by the longevity and enduring need for NXPowerLite, which turns 20 years old in November 2021!
We have always strived to ensure that NXPowerLite continuously improves year after year, without losing its way and becoming unreliable, complicated, or otherwise bloated. We’ve had to say ‘no’ to lots of perfectly reasonable requests to add features, so we can spend our development time improving the core compression and workflows. It’s not always very exciting, but customers have been clear about what they value.
NXPowerLite Always works, always with good quality output. I use it to compress all manner of documents from email attachments to ebooks. I’m happy because I can supply a quality product without worrying about size, and clients are happy because they get a quick, quality download.
Our guiding principle when it comes to NXPowerLite has always been to keep it simple, and laser-focused. In our view, it’s one job is to make customers’ files smaller, and we want to make sure it succeeds every time.
The main reason NXPowerLite is indispensable for PowerPoint users is that presentations still end up too large to send by email much of the time. With NXPowerLite they know they can rely on it to always make their presentations small enough to email.
Some of our customers have very low-bandwidth situations:
Incredible and the compression is a game-changer. Army Special Ops uses this – bandwidth is no problem!
Others have slightly higher ceilings:
Just love NXPowerLite. Drag and drop and all my files get compressed easily without any obvious loss of clarity. (This is) specially vital for PowerPoint files and PDFs when we run the risk of hitting the 10MB ceiling when sending attachments via e-mail.
And some just like to use it to make it seem like they can work magic:
I’ve been using NXPowerLite for several years now and to my clients, it’s magic how I return their bloated presentation files, small and easy to work with.
Still, others value its flexibility:
NXPowerlite is fabulous. It compresses PowerPoint files extremely well while still retaining image quality, much better and more customizable than you can do through PowerPoint alone. I highly recommend it for all PPT users.
Going forward, however, we improve NXPowerLite in version 10+, you can be sure we will continue to strive to be worthy of more customer reviews like this one:
NXPowerLite is simple, fast, and very effective at reducing file sizes. A pleasure to use.
Ampler
The final PowerPoint add-in to make to this list is called Ampler. Ampler is created by Kristian Nygaard Johansen and Sune Høj Kjeldsen. Both have worked in large organizations where they created tons of slides. When they started their own company, they missed all the extra tools they had access to within their previous organizations. Since they knew how to plug in extra capabilities to PowerPoint, they decided to create their own add-in. This is how Ampler was born.
Figure 18, below shows the Ampler tab of the Ribbon. Yes, it does have so many options, and some of these options bring forth even more options. These include productivity tools, library solutions, quality check systems, and charting capabilities. Ampler does provide you with many possibilities to play with.
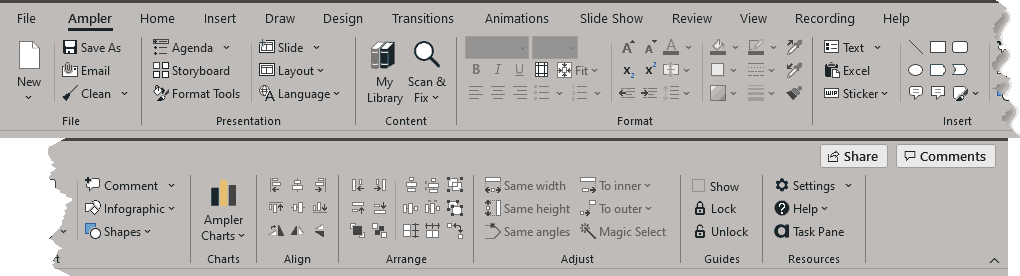
Figure 18: Ampler tab of the Ribbon
Now, Ampler is not a PowerPoint-only solution and you will see similar Ampler tabs populating the Ribbon in Word and Excel too. Ampler also works within Outlook to some level, but in this post, we will focus only on the PowerPoint side of things.
It’s worth noting that although the Ampler tab of the Ribbon appears densely populated, you can add or remove tools as needed using Ampler’s customization feature. You can also rebrand the entire Ribbon tab so that it is no longer called Ampler, but sports the name of your company, or even your individual name. By default, the Ampler tab is placed on the first location on the Ribbon, even before the Home tab, but that can be changed too.
Customizations to the Ribbon tab (Ampler calls them toolbars rather than tabs) can be done within the Ampler Settings area, as shown in Figure 19, below. While many PowerPoint options can be added to the Ribbon tab, there are many Ampler tools as well. Some of these tools such as Scan & Fix or Ampler Charts are so full-featured that they could have been separate add-ins.
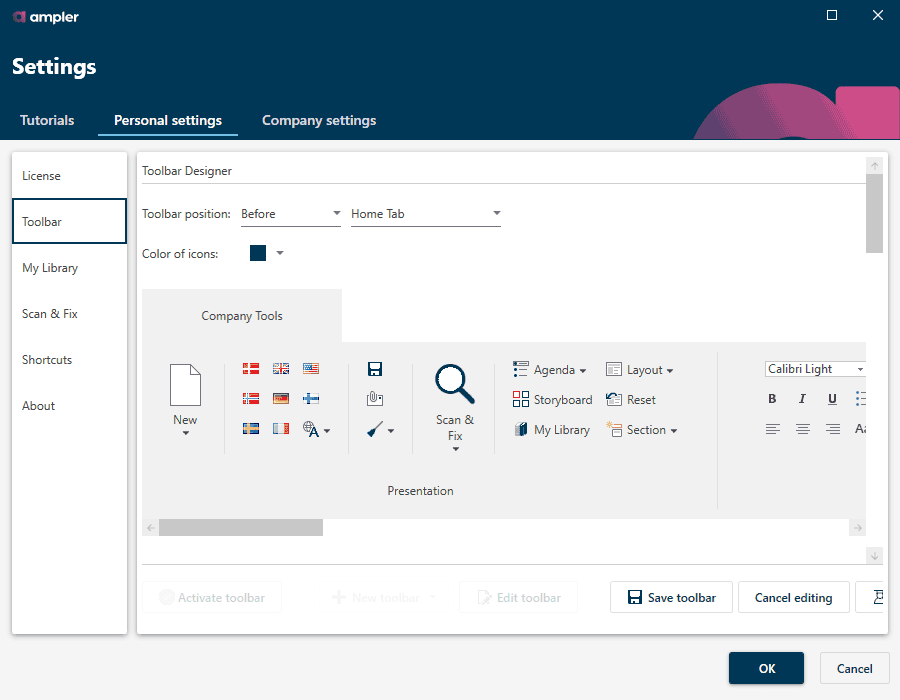
Figure 19: Ampler Customize options
Let’s play with Ampler’s Scan & Fix option that checks your entire presentation for inconsistencies, in this small walkthrough:
- Open any presentation that you want to check. Then, access the Ampler tab of the Ribbon, and choose the Scan & Fix option, as shown in Figure 20, below.

Figure 20: Scan & Fix in Ampler- Doing so brings up the Scan & Fix Task Pane, as shown highlighted in red within Figure 21, below. Notice that a bunch of issues have been listed on the Task Pane, and the first issue is active. Also, there’s a floating, contextual palette, shown highlighted in green within Figure 21 that explains issues and provides solutions.

Figure 21: Scan & Fix Task Pane- There are buttons within the floating palette called Ignore and Fix that let you ignore the problem or fix it. Once you click on any of the buttons, there may be more involvement needed from you in some cases. In most cases, you will be taken straight away to the next problem to fix.
- In our example, as shown in Figure 22, below, we can choose from several options. Do note that this is just a sample activity that we are explaining, and similar options are available for all issues that Ampler’s Scan & Fix identifies.
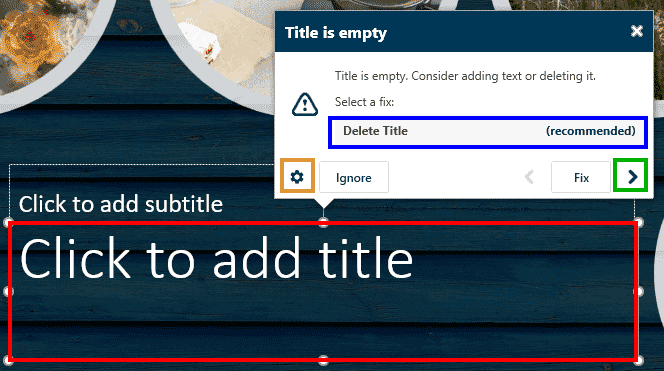
Figure 22: Several options in Scan & Fix- These options are:
- The area for the issue is highlighted on the slide. We made the highlighted area more prominent in red in Figure 22, above. In this example, we can type in the title text on the slide.
- The area highlighted in blue in Figure 22 provides a recommended solution, which is to delete the Title placeholder on the slide. You can decide if this is the solution you want to choose.
- You can opt to see more settings for such recommendations by clicking the Settings icon, highlighted in orange within Figure 22. Doing so brings up the Rule settings menu, as shown in Figure 23, below.
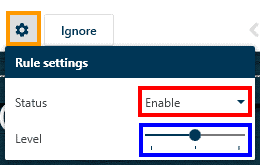
Figure 23: Rule settings in Ampler- You can click the Status option, highlighted in red within Figure 23, above, to bring up a drop-down menu, as shown highlighted in red within Figure 24, below. As you can see, there are three options. The Enable and Disable options are specific to the system where you are using Ampler, whereas the Disable (presentation) option is limited to disabling the identification of this issue for the open presentation only.

Figure 24: Status for Rule settings- You can hover over the Level option, highlighted in blue within Figure 23, to see a tool-tip detailing the three levels, as shown highlighted in red within Figure 25, below. By default, this option is set to Level 2, but you can play with Levels 1 or 3 to see what works best in your scenario.
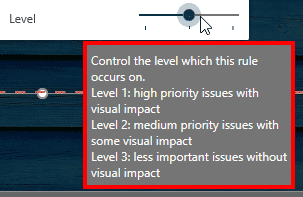
Figure 25: Level for Rule settings- You can also choose the Ignore option to proceed to the next issue (if it exists) or click the Fix option if you agree with the recommendation provided by Ampler.
- Finally, you can click on the Next button, highlighted in green within Figure 22 to proceed to the next issue. A similar Previous button is also available, but is grayed out in Figure 22, since there are no previous issues before the first one.
- Proceed through all identified issues, and fix or ignore as needed. You can also customize Ampler so that some issues are considered more significant than others, and this decision will depend upon your enterprise policies.
As you can see, Ampler provides an amazing way to scan problems and fix them in an intuitive, wizard-driven manner. Its algorithms are quite thorough, and you can further customize them as needed.

I reached out to Kristian Johansen to ask him about how to implement Ampler.
Geetesh: Kristian, can you tell us more about how an individual or an organization can implement Ampler within their small offices or large organizations?
Kristian: Sure. That is a great question. Thanks.
Ampler is ready to go straight out of the box for anyone looking to just get started. You simply download directly the Ampler site.
And for organizations that prefer to control the roll our, we support all installers.
Ampler has a detailed user guide directly in the program for easy reference and learning while using. For organizations that have the need, we help with setting up Ampler so users get off to a perfect start. This includes making sure the organization’s Slide Master is perfectly integrated, populating the library with templates, shapes, logos, icons, pictures, and other visual assets, setting up the agenda according to the organization’s Corporate Visual Identity (CVI) or Brand Guide, and making sure that Ampler Charts is formatted accordingly.
So, these were the five PowerPoint add-ins that users can work with every time they create slides. There are hundreds of other PowerPoint add-ins out there which are amazing but did not make it to this list. That does not mean that those add-ins are not as good as the add-ins listed on this page. It just means that we don’t have too much work experience with them, we are not aware of them yet, or they are great add-ins that you would use for a specific purpose a few times a month or a year, but not every day.
Hopefully, we will do more such features and also do this same listing of five add-ins for daily use after several months or years. If there’s an add-in you want to recommend, please comment below or reach out to us to let us know.
The views and opinions expressed in this blog post or content are those of the authors or the interviewees and do not necessarily reflect the official policy or position of any other agency, organization, employer, or company.